What's new

Galileo FX Tutorial: How to Install & Use the Trading Bot

David

Administrator
Staff member
Remote Installation Service: Enjoy a professionally installed Galileo FX. Our team will remotely connect to your PC to setup Galileo FX from A to Z. Click here to learn more.

Introduction

Welcome! We’re excited that you’re trying out Galileo FX! In this guide we’ll walk you through how to make your first automated trades with Galileo FX and use key features. We provide a thorough overview, but feel free to just skim and follow the pictures if you only want the instructions.

Every effort has been made to accurately represent this product and its potential. Information presented on this website are not to be interpreted as a promise or guarantee. Results may vary based on multiple factors, including what settings you use, how long you run the bot for, your broker, internet speed and more.

Let’s get started! Here’s what you’ll need:

  • PC with Windows (or Mac using Parallels/VMWare)
  • A browser (for example Google Chrome)
  • 15 minutes

0. Support & Troubleshooting​

We know that learning new software can be intimidating.

If you see an error or need help with something, do not panic, we are here.

Here are three accessible ways to reach our support team.

24/7 Chat Service
For basic issues such as Galileo FX not functioning, choosing a broker, or quick clarifications, you can rely on our chat service available round-the-clock at store.galileofx.com

Email Support
For further assistance, you can reach out to [email protected] where Chris, our top-notch support specialist with extensive experience in Galileo FX, will handle your queries. Please Note: Our email support service operates from 9am to 5pm CET (Central European Time), Monday through Friday.

Support Sessions
F
or more complicated inquiries, you have the option of requesting a support session via [email protected]. After providing proof of purchase, you can schedule a support session. Each client is entitled to two free sessions per month. In these sessions, you'll have the chance to interact with Chris directly and share your screen so that any complex issue requiring a deeper understanding can be resolved by him.

TIP: You can also post your questions here in this forum section, adding another way to get the help you need.

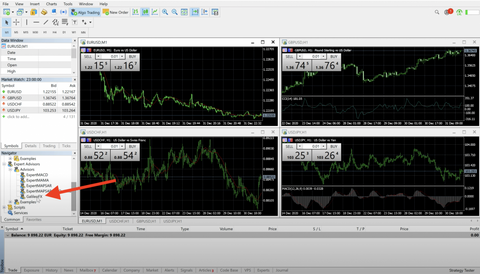
1. Download MetaTrader 4 (or MT5)​

MetaTrader is a platform for trading Forex, analyzing financial markets and using Expert Advisors. Millions of traders with a wide range of needs choose MetaTrader to trade in the market.

The platform offers ample of opportunities to traders of all skill levels: advanced technical analysis, flexible trading system, algorithmic trading and Expert Advisors, as well as mobile trading applications.

While you can download MetaTrader from the official developer website, Galileo FX requires a trading account, so you need to download MetaTrader directly from your broker website.

You can simply search on Google for brokers that support MetaTrader, then compare them and make your choice. For example, if you are located in Germany, you can search on Google for “metatrader brokers germany”.

Please see some example links by popular brokers below:

U.S. Brokers that support MetaTrader 4 or MT5

IF YOU USE XM BROKER: Please note that certain accounts registered with XM don’t work with Galileo FX. This is because XM uses a different order type code than all the other brokers. There are solutions to this issue, so please contact XM’s support and they will guide you.

Here are some additional lists to help you find the right broker:

2. Install MetaTrader​

Right-click/double-click on the EXE file downloaded from your broker site to open the install wizard.

Follow the instructions to complete the install.

3. Download Galileo FX​

Go to the Galileo FX official website to purchase a Galileo FX license. You will receive the following email after payment.

Check Junk/Spam folder, in case you don’t see the email in your inbox.

Click the link to download the Zip file and save it to your Desktop.

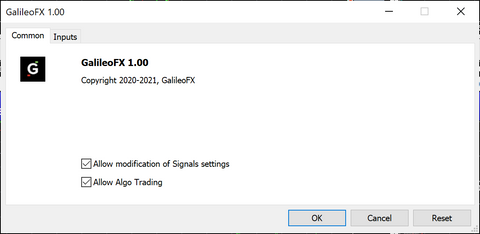
4. Install Galileo FX​

Follow this video to install Galileo FX on MetaTrader 5.


The video uses MetaTrader 5 as an example – if you are using MT4, it’s the same process but you need to use these files:
  • Galileo FX for MT4 (folder) instead of Galileo FX MT5 (folder)
  • Select the folder MQL4 instead of MQL5 that is shown in the video
Here's the video for MT4:
 
Last edited:

5. Load Galileo FX​

Restart MetaTrader 4 (or MT5) by closing the application and starting it again.

If you have installed Galileo FX correctly, you will see the Galileo FX Expert Advisor in the Navigator window on the left.

gfx-2048x1170_480x480.png

If you don’t see the Navigator window, press of Ctrl+N or click “View – Navigator” in MT4/MT5.

Please watch the Installation Video (paragraph #4 on this page) to see how to load Galileo FX into a chart.

Drag and drop Galileo FX from the Navigator window to a chart on the right. You need to repeat this step for each chart.

6. Make the first autotrade with Galileo FX​

We’ll now try some aggressive trading settings (make sure you are in Demo) to quickly test Galileo FX. We’ll use these settings only to quickly check that Galileo FX has been installed properly.

How to Change TimeFrame

1. Open MetaTrader
2. Click View > Toolbars > Timeframes
3. A bar with Timeframes will appear (M1, M5, M15…)
4. Select a chart on the right
5. Click the new TimeFrame on the bar
6. You will see that the name of the chart will change with the new TimeFrame (eg. USDEUR, M1)

Set the time frame for the chart to M1.

What’s the role of TimeFrame? For example, if you choose M30, Galileo FX will look for patterns every 30 minutes. If there are no 30M patterns (consecutive signals), it will not buy or sell but will wait until the pattern happens.

M1 will instruct Galileo FX to trade every 1 minute. You can change it later to M5 (5 minutes), M15 (15 minutes) or even D1 (one trade a day). As we are just starting, we’ll use M1 as an example.

How to Open Galileo FX and Change Settings

Open Galileo FX by double clicking on the Galileo FX label on the top right of the chart.

In the Common tab, click:

Capture2_480x480.png

In the Inputs tab start with the suggested settings:

  • Consecutive Bullish / Bearish Signal = 1 (this will tell Galileo FX to open many trades quickly. We use “1” only to quickly test the robot. With high values (up to 10), expect fewer trades during the day but with generally higher accuracy.
  • TakeProfit (TP) = 80 (example)
  • StopLoss (SL) = 80 (example)
  • LotSize = 0.01 (You can do different tests by using 0.1 or 0.5 (or even 1) and see what works best for you)
  • Magic Number = 786 . Change this only if you are using 2 robots at the same time.
Click OK to save the settings for this chart. You need to repeat this step for each chart.

Click “AutoTrade” on MetaTrader 4 (or “AlgoTrading” on MT5) as shown in the screenshot:

autotrading-mt4-1_1_480x480.png

We strongly suggest to try different settings, timeframes and pairs to find the best settings that work for you.

7. Loading Presets​

Open Galileo FX by double clicking on it (after it is loaded on a chart). Click Load in the inputs tab and load one of the .set files.

TIP: Find settings to start: https://store.galileofx.com/blogs/instructions/galileo-fx-settings

On MT4, due to a bug, you’ll need to open the .set file with Notepad to see the settings values, then input the settings manually in Galileo FX.

Check this video for a step-by-step tutorial:


8. Settings Explanation​

2_1_480x480.png


TIP: Find settings to start: https://store.galileofx.com/blogs/instructions/galileo-fx-settings

Consecutive Bullish/Bearish Signals

This is the most important setting of Galileo FX. It instructs the software when it should buy or sell. If it’s set low (1–3), the bot will trade with higher risk and higher reward, if it’s set high (7–10), Galileo FX will make fewer trades.

High Risk: Consecutive Bullish/Bearish Signals = 1 to 3

Medium Risk: Consecutive Bullish/Bearish Signals = 3 to 6

Low Risk: Consecutive Bullish/Bearish Signals = 7 to 10

For a detailed explanation, check this thread: How to adjust Consecutive Signals based on market trends (scalping, day trading and swing trading) | Official Galileo FX Community

Take Profit & Stop Loss​

Take Profit and Stop Loss are there to protect your trades. You can decide not to use them if this is what you really want. In case that you set values for them, Galileo FX will use them.

Without a Stop Loss, you have no control over the losses. No matter what trading strategy you have decided to use, money management is key to your trading success. It will help you stay longer in the markets.

The right way to set a Stop Loss is to always put it at the low of a buy position and to have it at the high of a short position.

If you open a position that turns out to be unsuccessful and the price goes against you, the Stop Loss will protect your capital. You will not lose more than what you have set as a maximum.

When you are in a winning trade, and the price is moving in your direction, it is very important to always set a Take Profit. This will secure your gains. Otherwise, the price might pullback (in this case your profit will decrease) or even reverse (this can cause you a loss instead of a profit). The take profit will also be set as a number of points (not pips).

For a detailed explanation, check this link: How to optimize Stop Loss, Take Profit and Lot Size | Official Galileo FX Community

Lot Size​

In the forex market, lot is the unit in which a trader buys or sells currency. There are different lot sizes and each lot size has a certain value assigned to it.

For example, if you have to buy 10000 units of any currency, you use the lot size of 0.10 And based on this you have profit and losses.

Types of lot sizes

There are 3 types of size.
  1. Standard lot (1.0):
  • A standard lot size is equal to 100,000 units of the currency you are buying or selling.
  • When you open a trade with a lot size of 1.0, you are buying or selling 100,000 units of that currency.
  • For example, if you open a buy trade on USDJPY with a standard lot size of 1.0, it means you bought 100,000 units of USD.
  • In this case, every point movement in the price represents a $10 profit or loss.
  1. Mini lot (0.10):
  • A mini lot size is equal to 10,000 units of the currency you are buying or selling.
  • When you open a trade with a lot size of 0.10, you are buying or selling 10,000 units of that currency.
  • For example, if you open a buy trade on USDJPY with a mini lot size of 0.10, it means you bought 10,000 units of USD.
  • In this case, every point movement in the price represents a $1 profit or loss.
  1. Micro lot (0.01):
  • A micro lot size is equal to 1,000 units of the currency you are buying or selling.
  • When you open a trade with a lot size of 0.01, you are buying or selling 1,000 units of that currency.
  • For example, if you open a buy trade on GBPJPY with a micro lot size of 0.01, it means you bought 1,000 units of GBP.
  • In this case, every point movement in the price represents a $0.10 profit or loss.
Here's an example using points:
  • Let's say you sold GBPJPY with a lot size of 0.01 (micro lot) when the price was at 143.000, and it moved to 143.500.
  • This means the price moved 50 points in the opposite direction, resulting in a loss of $5 (0.01 lot size x 50 points x $0.10 per point).
It's important to note that lot sizes are customizable based on your risk management strategy and account size. You can adjust the lot size according to your risk tolerance and trading objectives.

For a detailed explanation, check this link: How to optimize Stop Loss, Take Profit and Lot Size | Official Galileo FX Community
 
Last edited:

Trailing Step​

Example:
  • Trailing Start: 50
  • Trailing Step: 150
  • Take Profit (TP): 200
  • Stop Loss (SL): 0
Here is how the trailing stop would work:
  1. Initial Trade Setup:
    • When you open a trade, there is initially no stop loss since your SL is set to zero.
    • The trailing stop feature will not be visible on your charts until the trade moves in a favorable direction by at least 50 points (the trailing start level).
  2. Trailing Stop Activation:
    • Once the trade is in profit by the trailing start level of 50 points, the EA will begin managing the stop loss level.
    • The EA does not immediately move the stop loss to breakeven or the trailing start level. It waits for the trade to move an additional 'trailing step' points in profit.
  3. Adjusting the Stop Loss:
    • When the trade is in profit by the sum of trailing start (50 points) and trailing step (150 points), which totals 200 points, the stop loss will be moved to the price level that corresponds to the trailing start level (50 points) in profit.
    • For example, if your trade is in profit by 200 points, the stop loss will be adjusted to 50 points in profit.
  4. Trailing Stop Movement:
    • From this point onward, for every 'trailing step' points in profit (150 points in your case), the stop loss will be moved up or down by the same 'trailing step' points.
    • The purpose is to maintain a distance of 'trailing start' points (50 points in your case) from the current price, as the trade continues to progress in your favor.
To summarize:
  • The trailing stop feature becomes visible once the trade is in profit by the sum of trailing start and trailing step points.
  • The trailing stop can function even if your initial stop loss (SL) is set to zero.
  • The trailing stop is independent and managed by the EA on the trading platform, not by the broker's server.
  • Please note that the stop loss, take profit, and trailing stop levels are not guaranteed. In volatile market conditions, the price could gap, and these levels might not be respected.
It's essential to understand that the trailing stop feature provides dynamic stop loss adjustments to protect profits as the trade progresses. It is advisable to thoroughly test this feature on a demo account and monitor its performance to ensure it aligns with your trading strategy and objectives.

Risk %​

The risk percentage setting is designed to determine the percentage of your account balance that will be used for calculating the lot size. To utilize this feature properly, the "lot size" parameter should be set to "0" (referred to as "dynamic" lot size).

How it works:
  1. Setting Lot Size:
    • With the risk percentage feature enabled, you set the "lot size" parameter to "0" in the code.
    • By setting the lot size to "0," you allow the EA to calculate the appropriate lot size based on the risk percentage and your account balance.
  2. Managing Risk:
    • The risk percentage represents the portion of your account balance that you are willing to "risk" per trade.
    • For example, if you set the risk percentage to 1%, it means you are willing to risk 1% of your account balance on each trade.
  3. Dynamic Lot Size Calculation:
    • The EA dynamically calculates the lot size based on the risk percentage and your account balance.
    • As your account balance grows, the lot size will automatically increase to align with the risk percentage you have set.
    • This ensures that your position sizes are adjusted in proportion to your account size, allowing for controlled risk management.
Benefits of Using Risk %:
  • Risk Control: By setting a specific risk percentage, you limit the amount of your account balance that is allocated to each trade. This helps prevent excessive losses and minimizes the risk of a significant account drawdown.
  • Account Growth: As your account balance grows, the lot size will automatically increase, allowing you to potentially capitalize on profitable opportunities and maximize your trading returns.
It's important to note that proper risk management is crucial in trading. The risk percentage feature provides a systematic way to allocate your capital and limit risk exposure. However, it's essential to regularly review and adjust your risk percentage as your account balance and risk tolerance may change over time.

Always test your chosen risk percentage settings in a demo account and monitor their performance before applying them to a live trading environment. This allows you to gauge their effectiveness and make any necessary adjustments to align with your trading goals and risk appetite.

9. AutoTrading Crypto, Metals, Stocks, Indexes & more with Galileo FX​

First of all, check what asset classes your broker offers.

We’ll use Crypto as example but the process is the same for all asset classes.

Open an MT4/MT5 account with your broker.

Using your credentials, log in to your MT4/MT5 platform.

After opening the platform and logging in, right-click on the Market Watch window and select the ‘Symbols’ tab.

Select ‘Crypto’ from the list of assets in the ‘Symbols’ window.

symbols2_1_480x480.png


10. How to use Galileo FX from Mobile​

Galileo FX can be easily monitored from iOS and Android devices. You’ll simply need to download Microsoft Remote Desktop on your smartphone and PC.

You can:

  • Monitor Galileo FX’s trades
  • Stop Galileo FX in case of losses
  • Change settings
  • And everything else that you can do normally on PC.
Please follow Microsoft’s official guide here on how to install Microsoft Remote Desktop on your PC and smartphone.

11. Support & Troubleshooting​

We know that learning new software can be intimidating.

If you see an error or need help with something, do not panic, we are here.

Here are three accessible ways to reach our support team.

24/7 Chat Service
For basic issues such as Galileo FX not functioning, choosing a broker, or quick clarifications, you can rely on our chat service available round-the-clock at store.galileofx.com

Email Support
For further assistance, you can reach out to [email protected] where Chris, our top-notch support specialist with extensive experience in Galileo FX, will handle your queries. Please Note: Our email support service operates from 9am to 5pm CET (Central European Time), Monday through Friday.

Support Sessions
F
or more complicated inquiries, you have the option of requesting a support session via [email protected]. After providing proof of purchase, you can schedule a support session. Each client is entitled to two free sessions per month. In these sessions, you'll have the chance to interact with Chris directly and share your screen so that any complex issue requiring a deeper understanding can be resolved by him.

TIP: You can also post your questions here in this forum section, adding another way to get the help you need.
 
New member here. Is this software compatible with Windows 11? I see compatibility up through Windows 10, so I wanted to double check about whether Windows 11 is supported. Thanks
 
New member here. Is this software compatible with Windows 11? I see compatibility up through Windows 10, so I wanted to double check about whether Windows 11 is supported. Thanks
I don't know if anyone answered, but yes. I am running on Win11.
 
New here as well, how’s the bot doing for everyone? And how do I know if it’s working on MT5? Thanks in Advance
 
Back
Top